
What do you do with a tired front foundation bed that isn’t quite full sun, isn’t quite full shade, and just isn’t doing much for your house anymore?
You give it a makeover.
Our friends had a front garden bed filled with a few large, overgrown shrubs that had been there since they bought their home more than a decade ago. They were ready for a change, but this particular space came with a few challenges.
It’s mostly part shade, with deeper shade closer to the house and more dappled sunlight toward the front and side of the bed. They also wanted something colorful, welcoming and, most importantly, low maintenance.
So we started over.
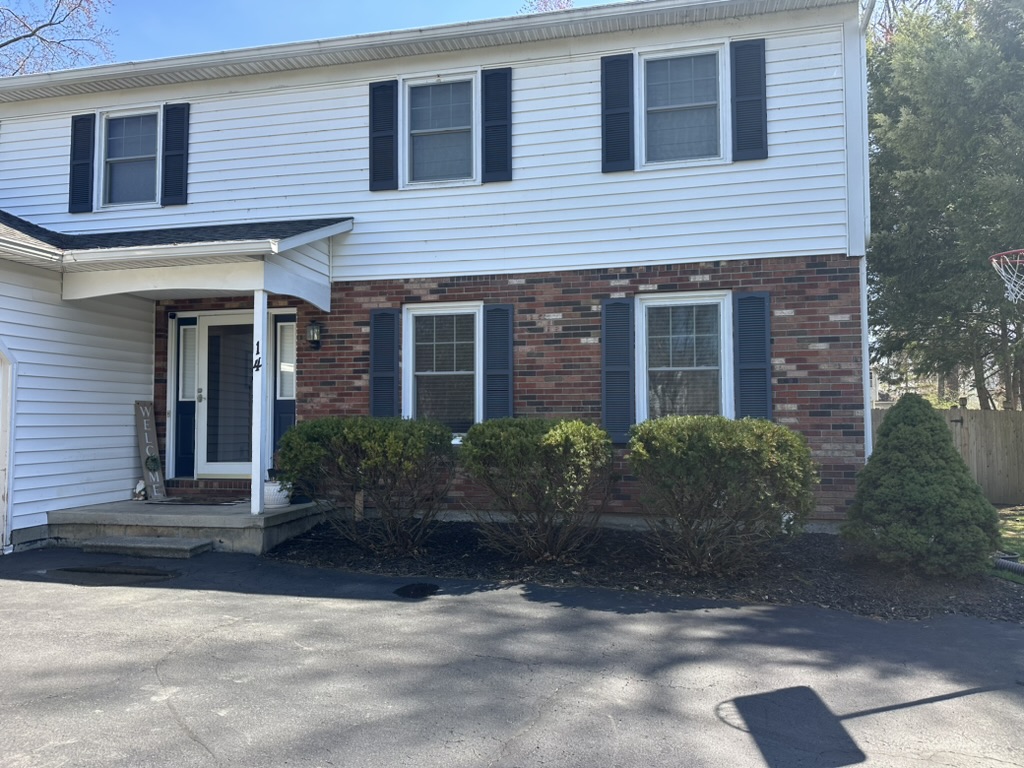
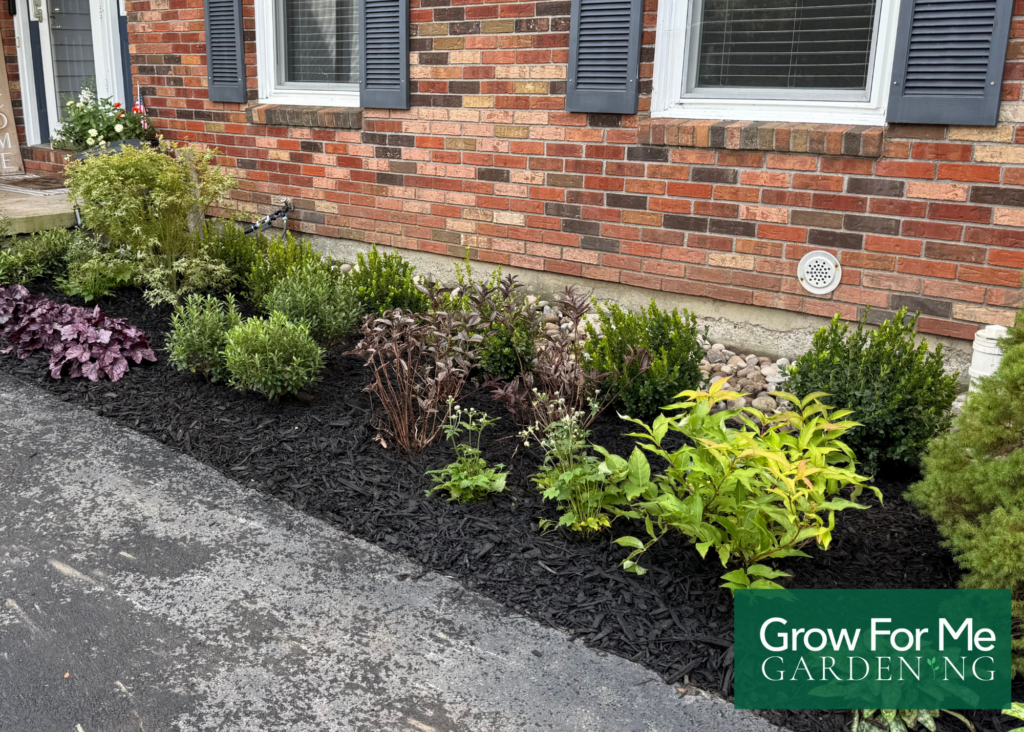
Our goal wasn’t to fill every inch of the bed with flowers. Instead, we wanted to create a garden with structure, contrasting foliage, seasonal color and enough variety to keep it interesting from spring through fall.
The basic formula was:
Because the amount of sunlight changes throughout the bed, we also chose plants based on exactly where they would be planted rather than treating the entire space as having the same conditions.
The backbone of this garden is a row of Sprinter® boxwoods along the foundation.
Boxwoods are surprisingly tolerant of shade, which made them a great fit for the area closest to the house. Sprinter is one of our favorite boxwood varieties because of how quickly it grows.
These will eventually reach around 4 feet tall and wide, and they can either be allowed to grow together into a hedge or pruned individually for a more formal look.
We also added two other evergreens to carry that structure through the rest of the bed.
Strongbox® inkberry holly adds another layer of evergreen foliage at roughly 2 to 3 feet tall and wide, creating a natural step down from the taller boxwoods.
Near the front door, we planted Sweet & Lo™ sweet box, a compact evergreen that handles part shade and even full shade beautifully. It stays around 1½ to 2 feet tall and wide, so it won’t interfere with the nearby hose. Even better, it produces wonderfully fragrant flowers very early in spring.
For our anchor plant, we chose a Metamorphosa Japanese maple.
This tree brings exactly what this garden needs: changing foliage color, interesting texture and a little bit of whimsy against the more structured evergreens.
Instead of planting it directly in the middle of the bed, we positioned it slightly off-center.
That small decision makes a big difference.
Perfect symmetry can sometimes make a foundation planting feel stiff. Moving the focal point off-center helps your eye travel through the garden and balances the established dwarf Alberta spruce on the opposite side.
The Japanese maple will also grow more slowly in this part-shade location, and it responds well to pruning if its size ever needs to be controlled.
Flowers aren’t the only way to bring color into a shade garden.
We used two varieties of Diervilla to create contrast through foliage: Kodiak® Jet Black and Kodiak® Orange.
Kodiak Orange produces warm orange new growth, while Jet Black develops deep, glossy foliage. Using plants with similar textures but completely different colors is one of our favorite ways to create contrast without making a planting feel too busy.
And don’t immediately dismiss a sad-looking clearance plant.
Our Jet Black Diervilla specimens weren’t exactly looking their best when we planted them, but a quick scratch test showed green underneath the stems and the roots were healthy. Sometimes fall clearance plants require a little faith. Come spring, they can look completely different.
Would it really be a Grow For Me Gardening makeover without hydrangeas?
For the sunnier corner of the bed, we planted Invincibelle Spirit II smooth hydrangeas.
These get approximately 3 to 5 feet tall and wide and produce beautiful pink flowers on new wood. Because they bloom on new growth, they’re also wonderfully easy to maintain. In spring, they can be cut back and they’ll produce an entirely new season of growth and flowers.
Next to them, we added one of our favorite mountain hydrangeas: Tuff Stuff Top Fun®.
This hydrangea blooms on both old and new wood, so we don’t recommend pruning it. If you want to deadhead spent blooms, simply cut immediately above the first healthy set of leaves below the flower.
Using two different types of hydrangeas together gives us different foliage, flower forms, heights and bloom habits while still making the planting feel connected.
Not sure when or how to prune your hydrangeas? That’s exactly why we created our Hydrangea Handbook. It walks you through pruning, watering, troubleshooting and caring for different types of hydrangeas so you don’t have to guess every spring.
Once the trees and shrubs were in place, we filled in with perennials.
Under the Japanese maple, we added Dolce® Wildberry coral bells for deep purple foliage. That color looks incredible against the brighter maple foliage.
We also repeated Jack of Diamonds Brunnera throughout the bed. This plant develops huge silvery leaves and beautiful blue flowers in spring. It’s one of those plants that can look a little underwhelming in a garden center container but becomes something completely different once established.
For even more early-season interest, we added Spot On™ pulmonaria, with spotted foliage and pink-and-blue spring flowers.
Then we extended the season with Fall in Love™ Sweetly Japanese anemone, which flowers in late summer into fall.
This is one of the easiest ways to make a garden feel interesting for more than a few weeks: don’t choose everything based on what looks good at the garden center on the day you’re shopping.
Think about when each plant will be doing something interesting.
Here, we’ll have spring flowers from the sweet box, Brunnera and pulmonaria; summer flowers from the hydrangeas and Diervilla; and late-season flowers from the anemones.
We’ll eventually add annuals for another punch of summer color, especially along the front of the bed.
One of the biggest differences between a collection of plants and a designed garden is repetition.
Instead of buying one of everything, we used groups of three and repeated several plants throughout the bed.
Some will eventually grow together and read visually as one larger mass rather than three individual plants. Others create a rhythm that moves your eye through the garden.
We also mixed looser groupings with more orderly lines. For example, some of the perennials are planted in a straight line that echoes the boxwood hedge behind them.
That combination gives us a little structure without making the entire bed formal — what we like to think of as a contemporary cottage garden style.
And when you’re planting a hedge, don’t make yourself crazy trying to get every measurement perfect.
We like to plant the center plant first, then the two outside plants. Step back, look at the spacing, and work your way inward. Getting out of the garden bed and looking at the planting from a distance is one of the most important things you can do while laying out a new garden.
As we started digging, we discovered plenty of old landscape fabric underneath the soil.
We’re not fans.
Landscape fabric may seem like an easy solution for weeds, but eventually weeds simply grow in the material and soil that accumulates on top of it. It can also interfere with what’s happening in the soil underneath.
We removed it wherever we encountered it and planted directly into the existing soil.
Once everything was planted, we finished the bed with mulch. Mulch helps retain soil moisture, suppress weeds and is especially important around shallow-rooted plants like hydrangeas.
If you’re creating a new garden bed, this is one of the best times to install drip irrigation.
We created a simple grid using drip tubing with emitters spaced every 12 inches, running separate lines through the front of the bed, center planting area and boxwood hedge.
Then we added targeted emitters where plants needed a little more attention.
The newly planted Japanese maple received an emitter positioned near its root ball, while the hydrangeas received higher-output emitters because they’re shallow rooted and appreciate more consistent moisture.
The entire system connects to a Bluetooth hose timer, which means watering can happen automatically without dragging a hose around the garden every few days.
If you want to set up something similar, we’ve put together a Drip Irrigation Guide with the components we use and links to the supplies.
New plantings still need some extra attention while they’re establishing. We gave this entire garden a deep soak after planting to settle the soil and eliminate air pockets. For the first week, we’ll water deeply about every other day and then gradually reduce that frequency as the plants settle in and temperatures cool.
The best part of this makeover is that it doesn’t require constant maintenance to look good.
The evergreens provide year-round structure. The perennials can mostly be cut back once a year. The smooth hydrangeas get a simple spring prune, while the mountain hydrangeas are best left alone. And the Japanese maple can be shaped only if needed.
Right now, you can still see plenty of space between the plants — and that’s intentional.
Gardens need time.
Over the next few seasons, the shrubs will grow together, the perennials will bulk up and the entire bed will become fuller and more layered. We’ll use annuals to fill some of those temporary gaps and add an extra punch of color while the permanent plantings mature.
And that’s one of our favorite parts of starting a new garden: this is only the beginning.
Thanks for growing with us.

Join our gardening journey and grow alongside us. From seed starting to full garden tours, we share tips, inspiration, and the joy of growing beautiful spaces.
We respect your privacy and will never share your information. Thanks for growing with us!
Get seasonal tips, behind-the-scenes from our garden, and be the first to know what we’re planting, pruning, and loving.
As a thank you, we’ll send you our favorite tried-and-true plants — the ones we grow in our own garden.