This post contains affiliate links. If you purchase through one of our links, we may earn a small commission at no additional cost to you.
If you’re tired of dragging a hose around the garden, drip irrigation can be one of the best upgrades you make.
We use drip irrigation throughout our gardens because it delivers water slowly and directly where plants need it, provides more consistent moisture, and makes watering much easier once everything is set up.
And while all the tubing, connectors, and emitters can make drip irrigation look complicated at first, the basic system is actually pretty simple.
In this guide, we’re walking you through how to install drip irrigation step by step, including how we set up the water source, lay out dripline in a garden bed, connect different sections, and add individual emitters when certain plants need a little more water.
Want to watch us do the entire installation? Follow along as we install a drip irrigation system in this newly planted garden bed in the YouTube video linked at the top of the page.
We’ve put together a free Drip Irrigation Quick Start Guide with the products we use, the basic setup, and a simple shopping list you can reference while planning or installing your own system.
Before you start laying out tubing, it helps to understand the basic pieces of a drip irrigation system.
Our setup generally follows this flow:
Timer → Faucet Kit → 1/2″ Main Line → Dripline OR 1/4″ tubing + emitters → Plants
That’s really the whole system.
Here’s what we use:
Water source
Tubing and water delivery
Connectors and tools
You’ll find straight connectors, elbows, T-connectors, and X-connectors. We tend to use T-connectors constantly, so that’s one fitting we like having plenty of on hand.
GFMG TIP: This is one project where we don’t recommend buying the cheapest drip tubing you can find. Heavier-duty tubing is easier to work with, less likely to kink, and holds up better over time.
Don’t want to keep track of all of this? Our free Drip Irrigation Quick Start Guide has our system broken into six simple categories with links to the exact products we use.
Before cutting anything, look at the garden as a whole.
The goal isn’t necessarily to put an emitter next to every single plant. You’re trying to create consistent moisture throughout the root zones while accounting for areas or plants that may need more water.
For this garden, we created several runs of dripline: one toward the front of the bed where annuals will eventually be planted, another through the center, and another near the boxwoods.
We also looked at the conditions throughout the bed.
Most of this garden is part shade, but one section receives considerably more sun and contains several hydrangeas. Rather than giving the entire garden more water to compensate, we can customize the system with additional emitters in that area.
This is one of our favorite things about drip irrigation: you can start with a relatively simple system and customize it as your garden grows.
Now we’re ready to connect the system to the water source.
If you still want to use a regular garden hose from the same faucet, start with a hose splitter.
On the drip irrigation side, we install our B-hyve Bluetooth Hose Timer. This connects to an app and allows us to automate the system rather than manually turning the faucet on every time the garden needs water.
From there, attach your faucet connection components, including the filter and pressure regulator.
The pressure regulator is important because drip irrigation operates at lower pressure than a standard hose connection. It helps regulate the water entering the drip system so everything can function properly.
Use plumber’s tape on the threaded connections where appropriate and make sure everything is securely tightened.
Finally, attach the fitting that connects your faucet setup to the 1/2″ distribution tubing.
GFMG TIP: Don’t forget about the timer at the end of the season. Our battery-powered timer is the portion of this setup that we bring inside for winter.

There are two types of tubing we’re using in this installation, and understanding the difference makes the rest of the project much easier.
Distribution tubing carries water. It doesn’t drip.
Dripline carries water AND releases it through built-in emitters.
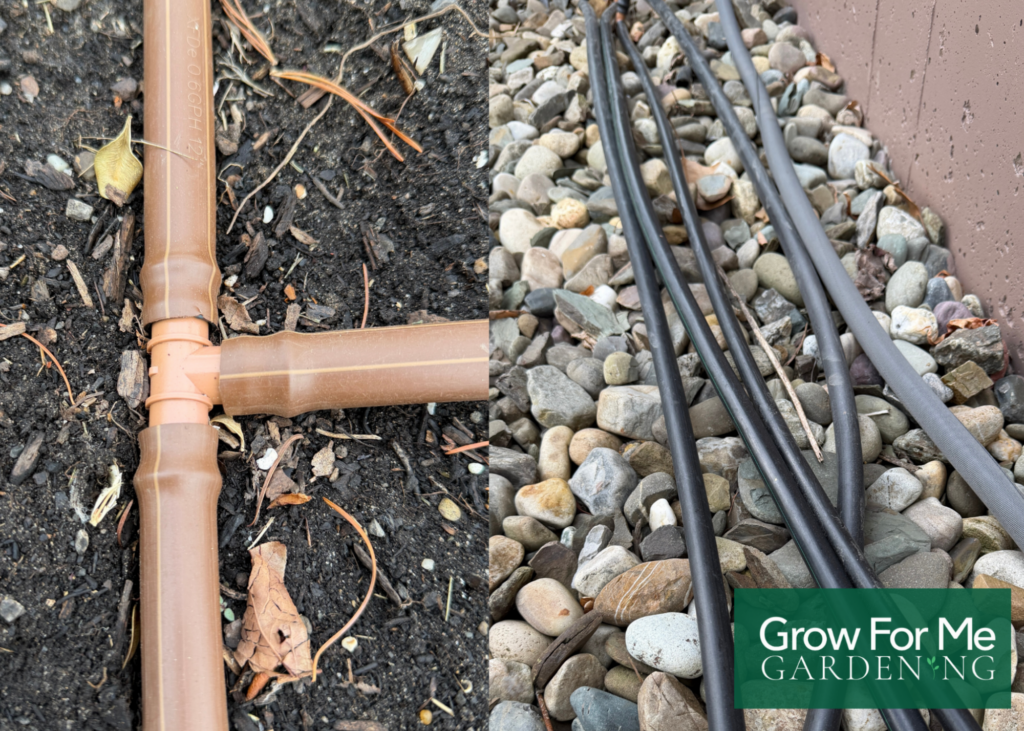
We use the non-emitting distribution tubing when we need to move water from the faucet to the garden, or across an area where we don’t actually want water being released.
Once you’ve reached the portion of the garden you want to irrigate, you can connect that main line to your dripline.
This distinction also makes it much easier to expand your system later.
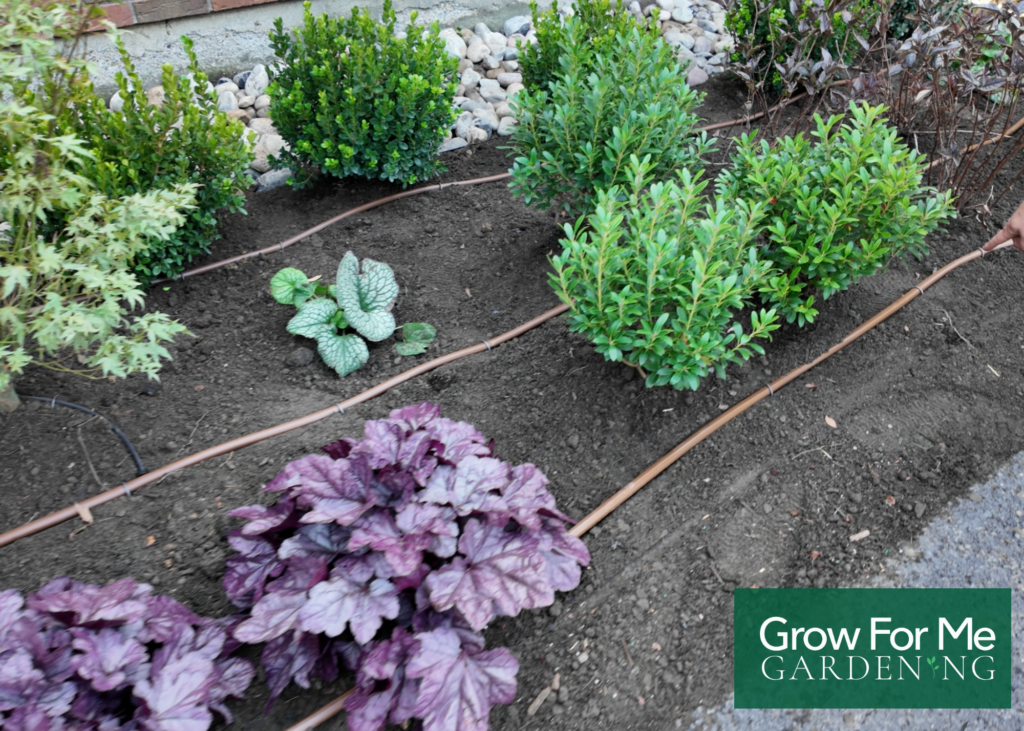
Now comes the fun part: laying out the actual dripline.
We use dripline with built-in emitters spaced approximately 12 inches apart, which allows us to create relatively even moisture throughout a garden bed. The dripline shown in this installation has emitters rated at approximately 0.9 gallons per hour.
Start weaving the dripline through the areas you planned in Step 1.
When you need to branch into another section of the garden, cut the tubing and add the appropriate connector.
You’ll typically use:
When cutting dripline, make your cut between the built-in emitter holes rather than cutting through one.
Push the tubing firmly onto the fitting and use landscape staples to hold everything in position as you work.
Don’t be stingy with the staples during installation. You can always remove extras once the tubing has relaxed and everything is exactly where you want it.
Once we’re happy with the layout, the tubing can be concealed beneath mulch for a much cleaner finished garden.
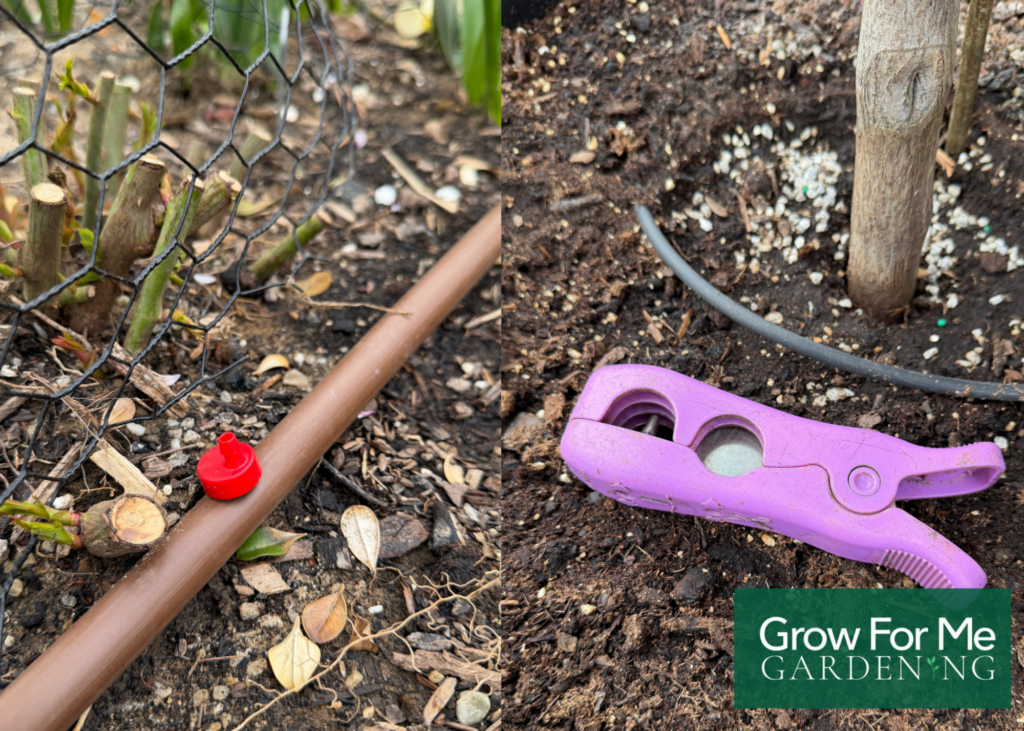
Here’s where you can really customize a drip irrigation system.
Your entire garden doesn’t necessarily have identical watering needs.
In this garden, for example, we had a newly planted maple. Because its roots haven’t spread into the surrounding soil yet, we wanted to make sure water was reaching its existing root ball.
Using our cutter + punch tool, we punched a small hole into the 1/2″ tubing and inserted a 1 GPH emitter. We then attached a short piece of 1/4″ distribution tubing and brought that water directly to the root ball.
We used the same concept for the hydrangeas, but with 2 GPH emitters.
These hydrangeas are growing in the sunnier portion of the garden and appreciate some additional moisture. A higher-flow emitter allows us to deliver more water to those plants during the same irrigation cycle without running the entire system longer and unnecessarily watering everything else.
That’s a much better way to think about drip irrigation than assuming every plant needs exactly the same setup.
Dripline = broader, consistent coverage
Individual emitters = targeted watering
You can use both in the same system.
Before covering everything with mulch, turn on the water and test the entire system.
The first time you run it, don’t panic if you hear some air moving through the lines. Give the system a little time to fill.
Then walk the entire garden.
Look for water coming from the dripline and individual emitters, check your connections for leaks, and make sure your targeted emitters are actually delivering water where you intended.
This is also a good time to reposition tubing and add or remove landscape staples.
Once you’re happy with everything, secure the tubing and cover it with mulch where appropriate.
And keep a few goof plugs around. Drip irrigation systems are incredibly easy to modify, and goof plugs allow you to close an unwanted hole if you move an emitter or change your setup.
This is probably the question everyone wants a single answer to, but there isn’t one universal runtime that works for every garden.
How long and how often you run drip irrigation depends on factors including your soil, weather, sun exposure, plants, emitter flow rates, and how established your garden is.
That’s also why understanding the output of your system matters.
Instead of choosing a random number of minutes, check the soil after your system has run and see how deeply the moisture has penetrated. Adjust your schedule based on what you find and the needs of the plants you’re actually growing.
Newly planted plants deserve extra attention.
In fact, we don’t rely on drip irrigation alone to initially water in a brand-new planting. After installing this system, we thoroughly watered the newly planted garden with the hose before adding mulch.
Once plants are established, you can continue adjusting the drip system and watering schedule based on your garden’s conditions.
Our setup uses a pressure regulator between the water source and drip tubing. It regulates the water entering the system so the lower-pressure drip components can work as intended.
Dripline has emitters built into it that release water along the length of the tubing. Distribution tubing simply carries water from one location to another without releasing it.
We use dripline when we want consistent coverage throughout a garden bed and distribution tubing when we need to move water without watering everything along the way.
We like to hide our drip tubing beneath mulch once the system has been installed and tested. It keeps the garden looking tidy while leaving the system accessible when we need to make changes.
Not necessarily.
For general garden-bed coverage, dripline may be all you need. We add individual emitters when we want more targeted watering, such as at the root ball of a new plant or around a plant that needs more moisture than its neighbors.
GPH stands for gallons per hour.
A 2 GPH emitter delivers water at twice the rate of a 1 GPH emitter. In this installation, we used a 1 GPH emitter for targeted watering at a newly planted maple and 2 GPH emitters around hydrangeas growing in a sunnier part of the bed.
Our dripline has enough openings that water naturally drains from the tubing when the system isn’t running, so we don’t blow out this particular system for winter. We do bring the battery-powered hose timer inside for the winter.
Your own winterization needs may differ depending on the components you’ve installed and your manufacturer’s instructions.
Absolutely, and that’s one of our favorite things about this type of setup.
You can add connectors, create additional runs, install individual emitters, or adjust the layout as your garden changes.
Start simple and expand as you need to.
Drip irrigation can seem intimidating when you’re staring at a pile of tubing and fittings, but once you understand how the pieces work together, the system itself is surprisingly straightforward.
Remember the basic flow:
Timer → Faucet Kit → 1/2″ Main Line → Dripline OR 1/4″ tubing + emitters → Plants
We’ve made it even easier by putting the products we use into one simple reference.
Our Drip Irrigation Quick Start Guide includes the major components of our system, the exact products we use, and clickable links so you don’t have to hunt down all the pieces yourself.
Once you get your basic system installed, don’t be afraid to adjust it. Gardens change, plants grow, and their watering needs change along with them. That’s the beauty of setting up a system that’s easy to expand.
Thanks for growing with us!
Join our gardening journey and grow alongside us. From seed starting to full garden tours, we share tips, inspiration, and the joy of growing beautiful spaces.
We respect your privacy and will never share your information. Thanks for growing with us!
Get seasonal tips, behind-the-scenes from our garden, and be the first to know what we’re planting, pruning, and loving.
As a thank you, we’ll send you our favorite tried-and-true plants — the ones we grow in our own garden.